Sunday, June 19, 2011

Happy Father's Day

Happy Father's Day to my Dad.

The Love of a Father

for his children
is more than provision
and protection,
leadership and guidance--

it's a part of who we are,
what we become,
and the way we serve the Lord
with our lives.

It is a strong and binding cord
that runs through the fabric of 
our character...

a rock we can stand on
for courage and support...
and a foundation that lies
securely beneath us.

Your love is an ongoing expression
of God's love--
and you are appreciated in ways
that go beyond words.

With Love and Respect for You
on Father's Day and Always.


After my adoption, meeting my Nana Lou.

 Meeting my Grandpa.

Meeting my Aunt Judy.

 Me and my Dad.  I love you Dad.

Tuesday, June 14, 2011

Go Green With a Vegetable Garden

Imagine going out and picking dozens of different kinds of vegetables that will feed your family for less than an hour of labor per day. You can achieve this by planting your very own vegetable garden.  A vegetable garden is an inexpensive way to obtain fresh, pesticide-free food that hasn’t traveled hundreds of miles to reach your plate.


Not only do they serve as important spaces for both our relaxation as well as providing a refuge for wildlife; organic growing is safe for you, your family and our environment. Here's Michelle Obama cultivating her "White House Kitchen Garden."


Growing your own fruits and vegetables are fresher and, consequently, higher in nutrients. They aren’t transported across the country or the world, and thereby don’t result in needless greenhouse-gas emissions. This saves you money, and helps our environment. Did you know, based on an Iowa State University report, that apples travel roughly 1,726 miles to get to the supermarket?


So how do you get started? 

Tip#1: Plan in advance

Decide what you’d like to grow. How much space can you devote to the project? How much time are you willing to spend? Answering these questions will help you to determine your priorities. For those with small spaces (or small ambitions), a container garden is an excellent choice. Containers can also supplement a traditional garden, providing a handy pot of herbs just outside the kitchen door, an experimental area for kids to grow their own produce, and allowing tender plants to be moved according to the season.


Others might consider building a raised bed to use for square-foot gardeningSquare-foot gardening allows you to maximize food production in a minimum amount of space.


Tip#2: Start small

When planning your garden, it’s better to start too small than to start too large. Please read that sentence again. In order to enjoy your garden, you must be able to control it. Don’t get too ambitious. It’s better to start small and to expand a little every year.

Tip#3: Choose productive plants

Some plants are more productive than others. If you want a rewarding, productive garden, do some research to find out what grows well in your area. In the U.S., one excellent resource is your state’s extension office or extension cooperatives.

My high school BFF's garden and her son. He's such a cutie! They've got a very productive garden.

Tip #4: Share with others

When you buy a packet of seeds, you generally receive more than you need. If so, share them with friends or neighbors, maybe even split the costs with them. Also consider sharing equipment. Careful borrowing and lending helps keep everybody’s costs down.

Tip #5: Buy quality tools

When you buy tools, it pays to purchase quality. Remember: thrift and frugality are about obtaining value for your dollar — not just paying the cheapest price. I’d rather own fewer tools that were a pleasure to use (and lasted many seasons) than own lots of crappy tools that didn’t cost me much. Keep your eyes open at garage sales. Sometimes you can get great deals on quality stuff.

Tip #6: Read up on the subject

Your public library will have many books on the subject, some tailored to your location. There are also many excellent web sites that can help you get started. Here are some useful resources:

Master Gardeners (Santa Clara County)
Collective Roots (East Palo Alto)
Silicon Valley HealthCorps 
Organic Gardening Guru
Urban Homestead (Pasadena)

Have helpful tips of your own? Feel free to share!


Saturday, May 28, 2011

An Old Garage Door Becomes a Planter

Some of you know that my sister, her roommate, Tina, and me, are building a sustainable garden in their backyard. Our first step is to make raised bed planters; high enough to keep Gucci out (beloved Siberian Husky), as well as height proportionate to avoid unnecessary bending.  Fortunately, due to a recent garage door replacement we have plenty of wood.

By re-purposing Tina's old garage door, she saved $50 from not having to discard it--saved it from ending up in a landfill--and we felt good for being environmentally conscience. Being green really does feel good.


We laid 2x4s for the door to float on for easier cutting.  Teardrop (my Jack) checked our work.


Tina layered clothing for the project; for the cold and to create a thicker barrier from a possible explosion. Mind you, none of us had ever used a power handsaw, let alone built something using a relative of the "saw" family, so the concern of a flying blade or exploding hand tool was in the back of our minds. The fact she's wearing flip flops (we all were) and lacks protective goggles is a good indication that we've never done this. Lol. 


We laid the door on the 2x4s. All I can say is, that door was HEAVY...I mean "need three guys" kind of heavy. But we were determined and made it happen, luckily no one lost their toes. Hehe. Oh, and my sister did her victory dance.


So now we think we're ready to saw away. Umm...so who knows how to work this thing? Where's the instruction manual?


My sister's convinced she can figure it out without the manual...


We were about to pry her fingers off the handsaw but she figured it out. Beginner's luck. Lol.


And my sister does another victory dance while Tina begins to cut.


We hit a roadblock and several of them--nails! So we had to unnail the big guy before our second attempt at cutting.


Once we finished unnailing, we cut through the door for our first planter piece. Yay!  We left the support beams intact since they held the door together.


Next, we cut the piece in half (vertically).


We measured one of the halves to make ends.


As the saying goes, "Measure twice before you cut."  We measured four times.


Our first "end"! Tina's ready to pre-hole drill this sucker.


We were starting to see the planter come together, and still no lost toes!


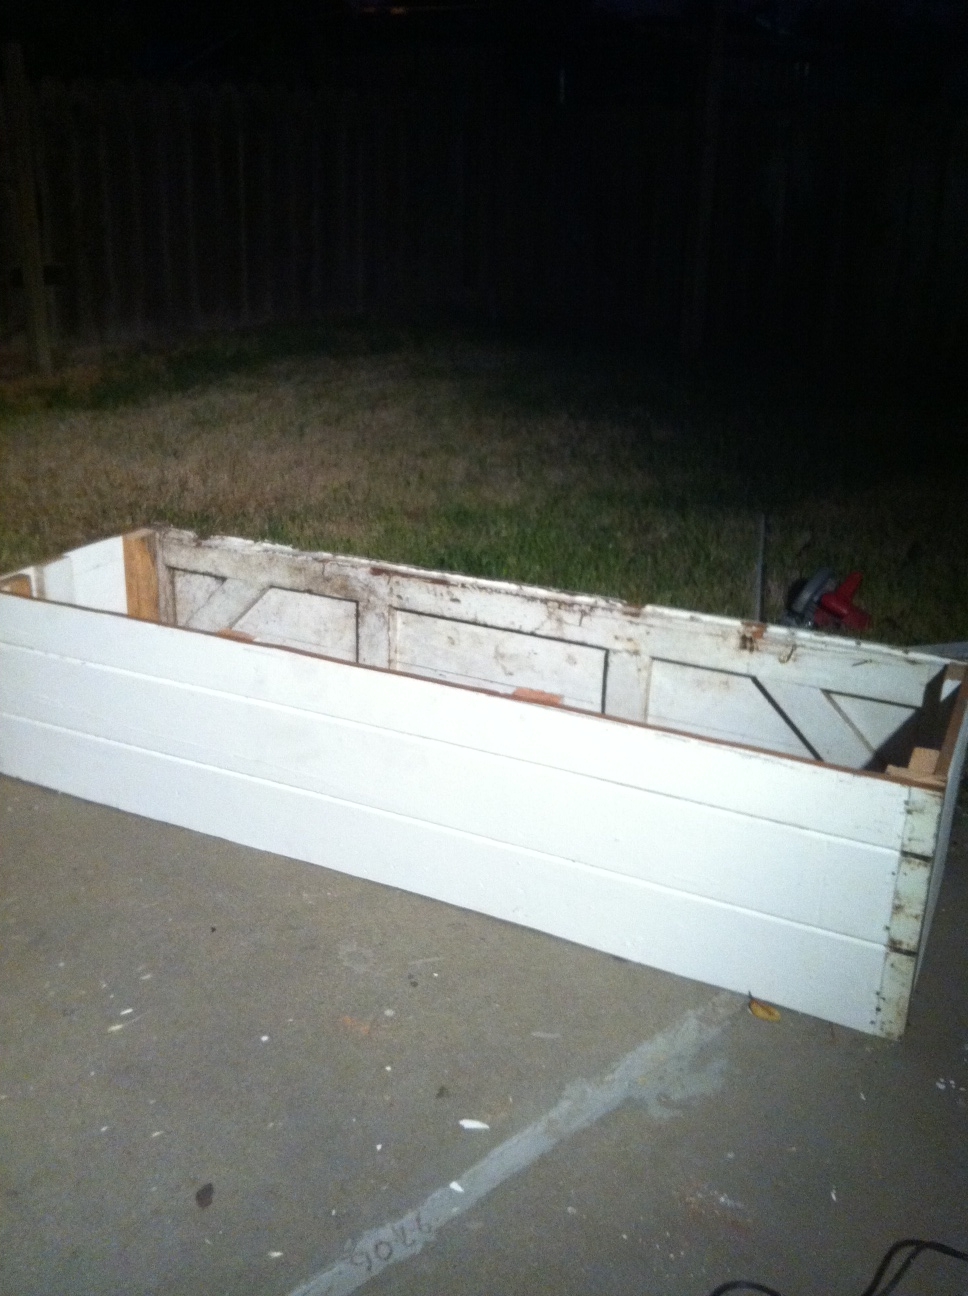
It was dusk by the time we attached the second end.  We were tired but couldn't stop; too close to achieving the vision.


We're smiling because we're almost done! Thank God!


We're done, we're done!


This took us one late afternoon and evening (approximately 6 hours).  We're planning to build two more planters starting this Sunday, the 30th.  They should go faster since we learned a lot from the first trial. I have to say, it was very rewarding to work until we reached our final result. Wohoo!

Also, just wanted to confirm that I did help throughout the project, but as the picture-taker, I luckily got out of being in the pictures, even though it made me look like a slacker. :-p

Sunday, May 22, 2011

Re-purposing a Damaged Quilt

There's something about a quilt that comforts the soul; its history, charm and aesthetic warmth--they're the feeling of home (even if you didn't grow up with one).  They're happy, playful, and like people, perfectly imperfect.


I enjoy one best on a cold day--wrapped up snugly warm, reading a book, and sipping hot cocoa.


I'm envious of those who can make them, and even more so of the recipients of these fantastic works of art.  To me, there's nothing better than a quilt that's made from love--by Nana, Mom or an Aunt.


So what do you when your favorite quilt is on its last leg of life?  Because it looks more like scrap material than a quilt.


Well, if it can't be repaired, and you're on the verge of throwing it out, then RE-PURPOSE.  By re-purposing your quilt, you're giving it new life, modernizing it, and keeping its sentimental value.  Just look at these cute rosettes made from the scrap quilt material above.


Throw pillows are a great use of quilt material, and super functional.  What a great way to remember Grandma.


I love this quilt banner I found on Etsy.  I could see this at a tea party.


A Christmas Stocking made from love.


Along with the Christmas theme, ornaments.  How cute are these!


When I was a child, my grandmothers (Nana & Nana Lou) made me stuffed animals.  I have fond memories playing with them.  Although they weren't this wild, here's a Japanese quilt stuffed animal for ideas.


Here are a few pictures of my old quilt, bought two years ago from a thrift store.  Unfortunately, half of it is ripped and missing (bought it this way with the intention of framing for art).


It is the same quilt. One area has more pinks and purples, while the other has browns and greens.  I want to kick myself for waiting so long to do this project, it literally took me about 5 minutes to create these this morning.  They're not too shabby if I say so myself...but then again, I love shabby chic so that would be good too.  A full two years later, here's the framed art. 


I think they would look darling in a child's room...inspiration below.


For now, they're going into our home office.  With all the left-over scrap quilt material, I'll be making more for my store.

Have any quilt recycling ideas?  Feel free to share. :-)